Oke, siap! Mari kita ngobrolin soal pasang AC mini-split ini, kayak lagi curhat di warung kopi, tapi semoga infonya tetap nempel dan bermanfaat ya. Tarik napas dulu, kopi udah siap? Sip!
Man, I tell ya, last summer was something else. The kind of heat that just clings to you, seeps into your bones even when you’re indoors. My old window unit? Bless its noisy, inefficient heart, it was just… done. It sounded like a dying walrus trying to sing opera, and the electricity bill? Don’t even get me started. My wallet was screaming louder than the AC itself. I knew I needed a real home cooling solution, something modern, something energy-efficient AC. That’s when the idea of a ductless mini-split started buzzing in my head, like a persistent fly on a hot day. I’d seen them around, heard whispers about their DIY mini-split installation possibilities, and how they’re a godsend compared to traditional HVAC systems for specific rooms or additions. But the thought of tackling something that involves refrigerant lines and electrical wiring? Gosh, my stomach did a little flip-flop every time I imagined it.
I spent weeks, maybe even months, scrolling through forums, watching YouTube videos – you know, the ones where some super-handy guy makes it look like he’s just assembling IKEA furniture, while my brain is doing somersaults trying to keep up. My wife, bless her patient soul, kept asking, "So, are we going to be cool this summer, or are we going to melt into a puddle on the living room floor?" And I’d just mumble something about "research" and "due diligence." The truth is, I was torn. On one hand, the cost savings of a DIY mini-split installation were super appealing. On the other hand, the sheer terror of screwing something up, of creating a leaky, ineffective, or worse, dangerous system, was a constant companion. It felt like standing at the edge of a cliff, looking down at a beautiful, refreshing lake, but knowing there might be a few sharp rocks at the bottom if I didn’t jump just right.
The decision finally came down to a particularly sweltering evening. The kind where even the ice in your drink melts before you can take a second sip. I looked at my dog, panting on the floor, and I just knew. This wasn’t just about my comfort anymore; it was about providing a better home cooling solution for everyone, including my furry, four-legged friend. And honestly, a part of me, the inner tinkerer, the one who always wants to prove he can fix things, just had to try. I figured, worst case scenario, I call in a professional to fix my mess, right? But what if I could do it? What if I could actually pull off a successful ductless mini-split installation and have a truly energy-efficient AC that didn’t break the bank? The thought was exhilarating, and terrifying, all at once. So, I took a deep breath, cracked my knuckles, and started making a list. This was it.
The Great Deliberation: Why a Mini-Split, Anyway?
Before even thinking about tools or wires, the first hurdle was convincing myself this was the right path. Why a mini-split over, say, another window unit or a portable AC? Well, for starters, zoning. This was huge. My house has these weird hot spots – the upstairs office where the sun just bakes all afternoon, and the master bedroom that somehow traps all the heat. With a mini-split, you can cool specific areas, not the whole darn house, which means less wasted energy and lower bills. Energy efficiency is a real thing with these units, especially the inverter-driven ones. They don’t just blast on and off; they modulate, kinda like a dimmer switch for your cooling.
And then there’s the whole "no ducts" thing. My house is old, like, "built when cars were a novelty" old. Adding ductwork would be a nightmare, a major construction project that I definitely wasn’t up for. So, a ductless mini-split was practically screaming my name. But the flip side? The initial cost is higher than a cheap window unit, and the installation complexity is way up there compared to just plopping something in a window. I kept thinking, "Am I biting off more than I can chew here?" The internal monologue was exhausting. But the promise of quiet, efficient, targeted cooling won out. My dream of a cool, quiet sanctuary in my sweltering office was just too strong.
Gathering the Troops (and Tools): What You’ll Need
Alright, so decision made. Now for the nitty-gritty. This is where the initial excitement started to get replaced with a healthy dose of dread. The list of mini-split installation tools is… extensive. It’s not just a screwdriver and a hammer, folks. This is like preparing for a major cooking project where one wrong spice ruins everything, except instead of a ruined dinner, it’s a busted AC unit and a hole in your wall.
Here’s a quick rundown of what I ended up needing, and trust me, don’t skimp on these. They are crucial for a proper mini-split DIY installation:
- Vacuum Pump: This is non-negotiable. Seriously. It pulls out all the air and moisture from the refrigerant lines. Without it, your system will die a slow, painful death. This is the lungs of the operation.
- Manifold Gauge Set: To monitor pressures and know when you’ve got a good vacuum. Your system’s blood pressure monitor.
- Flare Tool & Deburring Tool: This is where the magic (and potential disaster) happens. You’re shaping copper lines. If the flare isn’t perfect, you’ll have leaks, and leaks mean no cold air and wasted refrigerant. This step gave me nightmares.
- Torque Wrench: For tightening those flare nuts just right. Too loose, it leaks. Too tight, you crack the copper. Goldilocks, but for HVAC.
- Hole Saw (the right size!): For drilling the big ol’ hole through your wall. This is the point of no return.
- Line Set: The pre-insulated copper pipes, electrical wires, and drainage hose that connect the indoor and outdoor units.
- Mounting Brackets/Pad: For the indoor and outdoor units.
- Electrical Wiring & Disconnect Box: Safety first, always! Make sure you know what you’re doing or call an electrician for this part. I definitely double-checked every single wire, like a nervous bomb disposal expert.
- Level, Tape Measure, Screwdrivers, Wrenches, Pliers, Wire Strippers, etc. The usual suspects, but still essential.
Looking at that pile of tools, my initial confidence wavered. "Can I really do this?" a little voice kept whispering. But then I reminded myself, "Millions of people have. You can learn." And thank goodness for those detailed online tutorials. They were my virtual instructors, my calming presence.
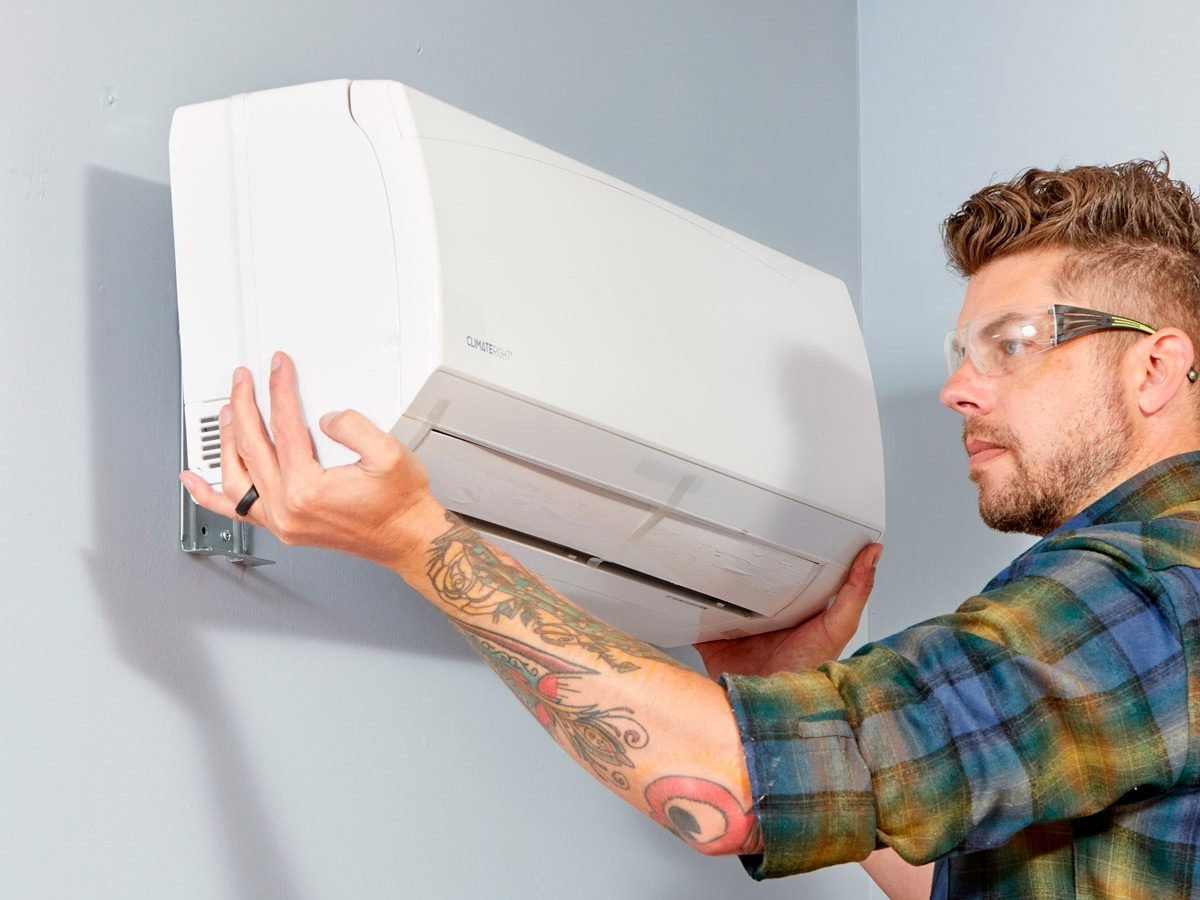
The Dance of the Ducts (or Lack Thereof): Outdoor Unit & Indoor Unit Placement
Okay, tools gathered, deep breaths taken. Now, the real fun begins: mini-split unit placement. This isn’t just about where it looks good. It’s about efficiency, drainage, and ease of access. For the indoor unit (the air handler), you want it high on a wall, ideally centrally located in the room you’re cooling. Avoid direct sunlight if possible, and make sure there’s enough space around it for air circulation. For the outdoor condenser, think about a flat, stable surface, away from direct sunlight (again, for efficiency), and where the noise won’t bother your neighbors or your own quiet enjoyment. Also, consider drainage for both units – water has to go somewhere!
The moment of truth for me was drilling that big, fat hole through the wall. I measured, I double-checked, I triple-checked. My hands were a little sweaty. Cutting a hole in your house feels like performing surgery on your own living room. There’s no undo button. I used a level, made my mark, and then, with a deep breath and a prayer, I let the hole saw do its thing. Whirrrrrr. Dust flew. And then, pop, it was through! The relief was immense, like finally popping a stubborn bubble wrap. One hurdle cleared.
After the hole, it was about mounting the indoor unit plate, then the outdoor unit on its pad. Getting them level and perfectly aligned with the hole was a bit of a jigsaw puzzle, but with patience, it came together.
The Veins and Arteries: Connecting the Lines
This, my friends, is arguably the most critical part: connecting the refrigerant lines, the electrical wiring, and the drainage hose. Those copper refrigerant lines are like the veins and arteries of your new system. They carry the lifeblood (refrigerant) that makes the magic happen.
- Flares, Flares, Flares! You have to cut the copper lines to length, then use that deburring tool to clean the edges, and finally, the flare tool to create a perfect, conical seal at the ends. This is where most DIYers mess up. I watched about ten different videos on flaring alone. It has to be smooth, even, and just the right size. My heart was pounding with every flare I made. "Is it good enough? Will it leak?" I must’ve practiced on scrap pieces for an hour before I touched the actual lines.
- Connecting the Lines: Once the flares are perfect, you connect them to the ports on both the indoor and outdoor units. This is where the torque wrench comes in. You tighten them to a specific torque setting – not too loose, not too tight. This step requires precision, like a surgeon sewing up an incision.
- Electrical Wiring: Now, if you’re not comfortable with electricity, please, please call a professional for this. It’s serious business. But if you are, follow the wiring diagram exactly. Connect the power from your breaker panel to the outdoor disconnect box, and then the communication wires between the outdoor and indoor units. Double-check every connection. Triple-check. Use a multimeter to ensure no stray voltages. Safety first, always.
- Drainage Hose: This one’s simple but important. The indoor unit produces condensation, and that water needs to go somewhere. Make sure the drainage hose has a continuous downward slope, with no kinks or low spots where water can pool. Otherwise, you’ll have water dripping inside your house. Not fun.
Finally, the moment of truth for the lines: the vacuum. This is where you connect your manifold gauge set and your vacuum pump to the refrigerant lines. You turn on the pump and let it run for a good long while, usually 30-60 minutes, to pull all the air and moisture out of the lines. You’ll see the needle on your gauge drop into the deep vacuum range. Then, you shut off the valve, turn off the pump, and wait. If the needle holds steady for 15-30 minutes, it means you have no leaks. Phew. That was the longest 30 minutes of my life, staring at that needle, praying it wouldn’t budge. When it held, I practically did a little victory dance right there in the yard.
The Moment of Truth: Firing It Up!
Alright, everything’s connected, vacuum held, prayers said. It was time for the grand finale. I carefully opened the service valves on the outdoor unit, allowing the refrigerant to flow through the newly installed lines. Then, I went inside, took another deep breath, and pressed the "on" button on the remote.
The indoor unit whirred to life. There was a moment of silence, then a gentle hum, and then… a faint breeze. I held my hand up. It wasn’t cold yet. My stomach tightened. Did I do something wrong? Was all that effort for nothing? This was the true test, the culmination of all the sweat, the head-scratching, the endless YouTube videos.
Then, slowly, steadily, the air started getting cooler. And cooler. And then, glorious, wonderful, cold air started blasting out! Oh, the sheer relief! It was like a dam breaking, all that tension just washing away. I let out a whoop, probably startled the dog. That first blast of cold air, after all that work, felt like the purest form of victory. I walked around the room, feeling the cool air spread, and a massive grin spread across my face.
I still did a final check with soapy water on all the flare connections, just to be absolutely sure there were no tiny, insidious leaks I missed. (No bubbles! Yes!). And then, I just sat there, in my now blessedly cool office, enjoying the hum of my very own, self-installed ductless mini-split.
Was It Worth It? The Verdict.
So, after all that, was it worth it? Every single frustrating, confusing, sweat-inducing moment? Absolutely. A thousand times, yes. The satisfaction of knowing I installed that energy-efficient AC myself is immense. My electricity bills have plummeted, and I can finally work in my office without feeling like I’m in a sauna. The quiet operation is a dream compared to that old window shaker.
It wasn’t easy, not by a long shot. There were moments of genuine doubt, of wanting to just throw in the towel and call a professional. But the knowledge gained, the money saved, and the sheer pride of accomplishment? Priceless. If you’re thinking about a DIY mini-split installation, I’d say this: do your homework, get the right tools, be patient, and don’t be afraid to take breaks when you feel overwhelmed. It’s a big project, but for a true home cooling solution that lasts, it’s an incredibly rewarding one. And hey, if I can do it, a regular guy who used to get nervous changing a lightbulb, then maybe, just maybe, you can too. Now, where’s that cold drink? I earned it.

